Sunday, September 4, 2011

Butterfly Apron


Today I finished my Butterfly Apron from Crochet Adorned . I crocheted the butterfly pocket and the trim yesterday and sewed up the apron today. The directions for the apron are included in the book. It is really a basic gathered half apron so it was a quick project to sew.

I had picked out the main fabric from my stash because I liked it with the pink thread I used for the crochet. So after making the butterfly and the trim I needed to find something in my stash to use for the contrast waistband and lower band. Even though I have a huge stash it proved to be difficult to find anything that looked good with this fabric and trim.

You may ask why didn't I just go out and buy something. Well I joined


Stashbusting September at T-Shirt Diaries.


So I am not allowed to buy any new fabric or craft supplies. After rooting through several bins of unorganized fabric nothing was really looking even remotely right with what I had picked out so far. Finally I found this black and ivory gingham and I thought it gave the apron just the right vintage feel and contrast. I was thinking about giving this as a gift but once it is finished I want to keep it for myself. Maybe I will just make another one for a gift.

I am going to enter this project in the Craft Book Month Linky


Craft Book Month at Craft Buds


Party. I might win some more goodies to add to my stash. I think that is allowed since winning isn't buying anything.

Saturday, September 3, 2011

Ruffle Apron


I have been hearing about Hobby Lobby for a long time now. There has never been one near me. Well about a month ago they opened one in a town about an hours drive from me. So my friend and I went to check out the grand opening. This is my kind of store. I picked up a few things that I didn't know I needed until I saw it.

One thing I purchased was the book Crochet Adorned. I have been eyeing this book for quite some time. It is full of crocheted embellishment for clothing accessories and household item. I have already started a project from the book the Butterfly Apron.

Maybe you can tell I like aprons because one of the other things I picked up was a kit for making an apron. It was a fabric panel for a ruffled apron. It was very easy to sew up. All I had to do was cut out the pieces, hem the edges and attach the waistband and ties. A quick and easy project. This apron has another thing in common with the project from the book. Another favorite of mine butterflies. The very top fabric on this ruffled apron has butterflies on it. And the project from the book is an apron with a crocheted butterfly for a pocket. Both are fun projects. And I think this little ruffled apron will become a gift.

Thursday, September 1, 2011

Vintage Potholders With Pattern


I picked up this vintage crochet book from Out Of The Ashes. She sells all kinds of vintage sewing pattern and a few vintage knitting and crochet books. Mine is The Magic Of Crochet (Gifts). It is copyright 1941 by the Spool Cotton Company. The price was 10 cents originally and it looks like it was resold at some point for 99 cents. I paid $4.00 for it and I thought that was a bargain. It has all kinds of cute accessories for the home and some fashion items too. There are several things I want to make. The instructions are easy to follow but you must convert the thread and needle size to a modern equivalent. This is not critical with things like place mats or pot holders as they don't need to fit anything they just need to be close. There are no gauges in the book so I just tried to find a thread that worked with the size needle suggested. Most of the patterns use a very tiny needle and thread size.

The pattern I tried first was these potholders called Ship Shape in the book. I had everything I needed around the house. I even had some tiny steel crochet hooks. I had just bought a set of vintage steel crochet hooks in a little plastic case at a flea market. This pattern used one of the medium sized hooks in the set. So I thought it was doable. I even found a couple of bone rings in my stash. I think these probably came from my grandmother's stash. I don't really think they are bone but some sort of plastic. They are quite old though. The thread was leftover from another project and it is new crochet thread. I like these a lot. They turned out bigger than I thought they would. Most of the vintage potholder patterns I have tried are a bit to small for my taste. I don't know if woman had tiny hands in the 40's or they were just trying to conserve on thread. They are a bit thin for a pot holder too but I think they would work for a stove top pot handle or a microwave dish. If nothing else they are cute decorations.

I think the copyright has expired by now so I am going to share the pattern. The pattern is for six potholders three in each color combination. I only made two of them.

Materials: J&P Coats Knit-Cro-Sheen 1 ball white or ecru (referred to in directions as "light color") and 2 balls of dark color.
Milward's Steel Crochet Hook No. 7 and 6 bone rings.

This amount is sufficient for entire set of six potholders.

With light color, work sc closely over ring. Join with a sl st to 1st sc made. 1st rnd: Ch 3 (to count as 1st dc), dc in front loop of 6 sc, ch 3, dc in front loop of next 6 sc. Turn, and working in remaining loop of same sc's, make dc in next 6 sc ch 3 dc in 5 sc. Join with sl st to top of first ch 3 made.

2nd Rnd: Ch 3 (dc in each dc across to ch 3 sp make 2 dc ch 3 and 2 dc) twice; dc in each remaining dc. Join.

Repeat last row 15 more times. Fasten off. Attach dark color and repeat 2nd row 2 more times. Fasten off. Attach light color and work 2nd row once again. Working through both thicknesses ( picking up only the center loops), make sc in each stitch and 4 sc over ch across, ch 5, turn, and make edging as follows: * Ch 4, 3 tr in base of ch 4, skip 3 sc, sc in next sc repeat from* across. Fasten off.

Make 2 more pot holders same as this. Make 3 more pot holders same as this only reversing colors.


Monday, August 22, 2011

Vintage Sewing Books


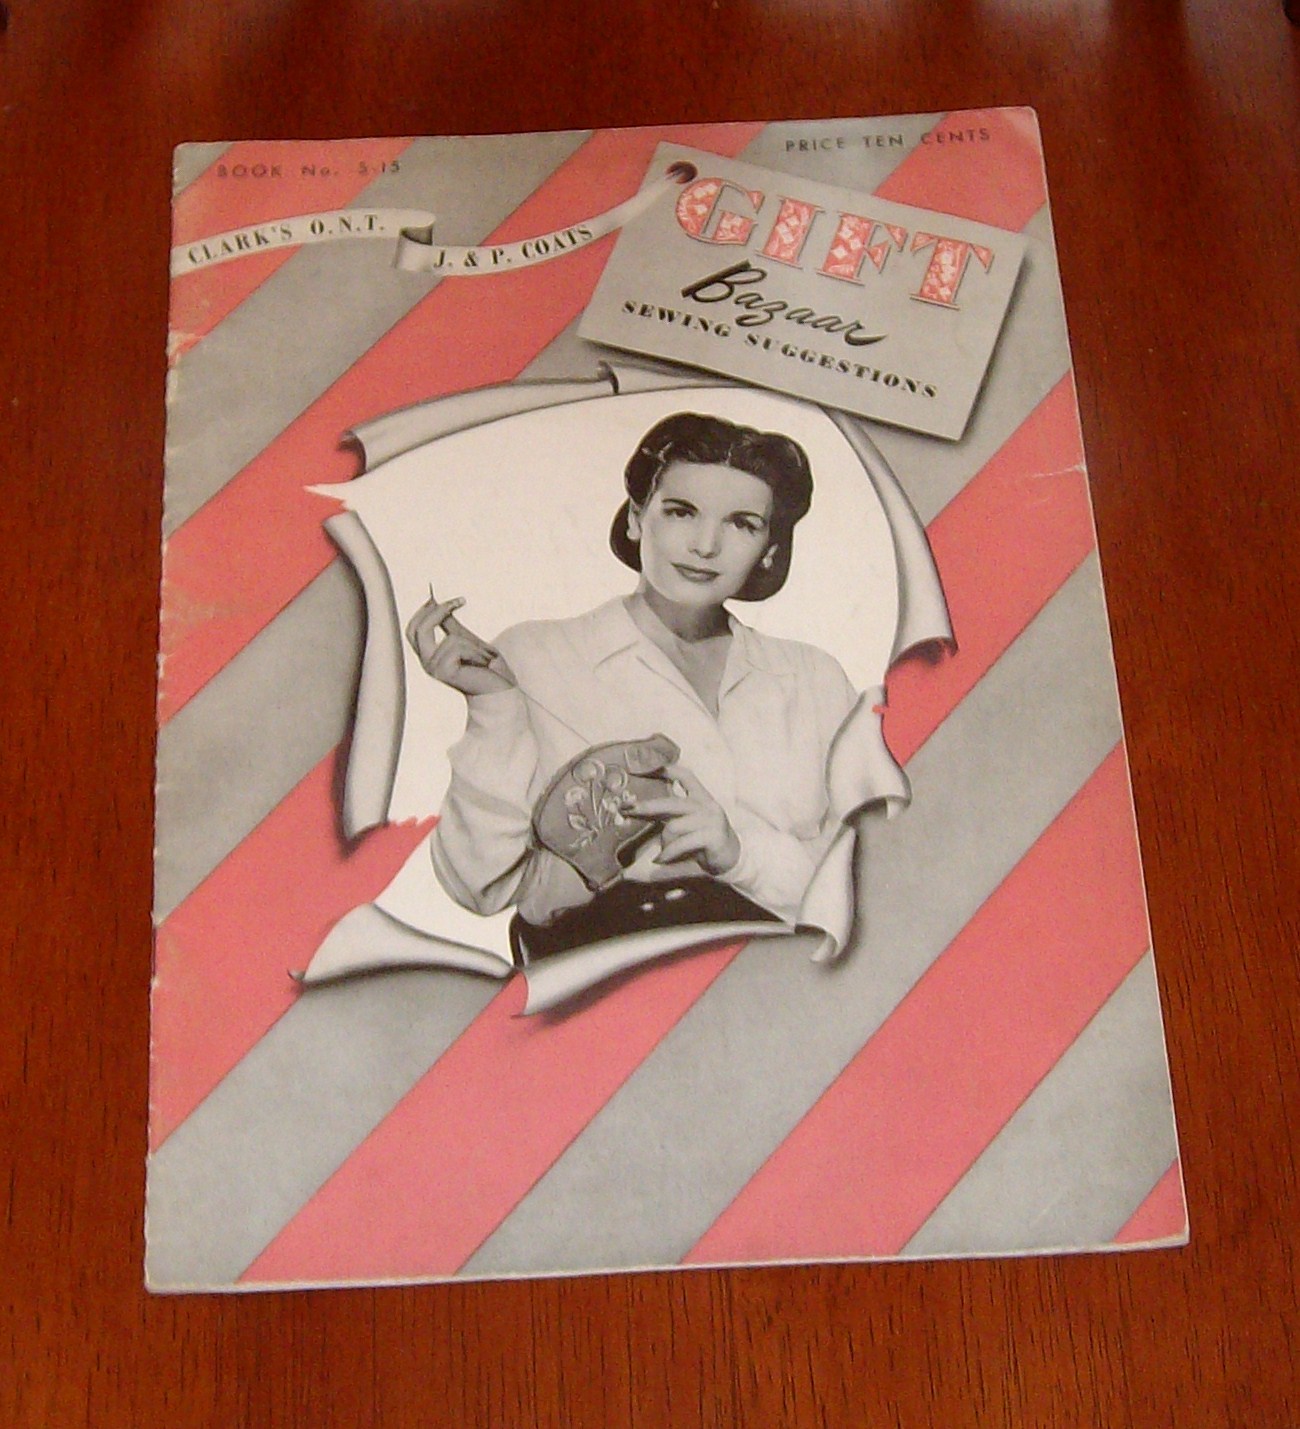
I love collecting vintage sewing books. I recently picked up two vintage sewing books. Gifts You Can Sew is from 1942 and Gift Bazaar Sewing Suggestions is from 1944.

Gifts You Can Sew has dozens of apron projects in it. They all look very straightforward and easy to make. I want to make them all but some of my favorites are the Pot Holder Apron that has button on pot holder pockets. Then there is a Gardening Apron that has a kneeling pad that snaps or buttons on the apron at the knee. I love the Baby Feeding apron to keep baby clean and safe in his high chair. This little apron has sleeves for baby's arms and ties that tie onto the high chair and the bottom of the apron covers the entire tray of the high chair. I think this would be a great idea for using in a restaurant highchair. Another one that was on the page labeled Presents for tots and children is a knitting apron that conveniently folds into a bag. The knitting apron has a gathered pocket on the front to hold your ball of yarn. There are many toys and accessories as well as a section of gifts for men in the service. As far as I can tell these gifts would be useful for anyone man or woman in or out of the service. Here you will find directions for making a scarf. a money belt and a book cover to name a few. Some knitting and crochet projects are scattered throughout the book too.

The Gift Bazaar Book has some sweet aprons in it too. My favorites in this book are the children's toys. There is a lamb, a Scottie dog and an adorable pig. I love the illustration with the gingham pig. he is standing in a pin made with straight pins and there are some trees made with clothespins and thimbles. There are four handbags that look right in style now, They all look very simple to make too. And I must try the cute pig pot holder and the sweet kitten potholder. They would be fun to make and I can always use a cute potholder. I love making up a quick small project. What shall I make first with so many cute ideas? The shaped patterns must be enlarged but I think I can do that on my scanner printer. I think I would make the potholder slightly larger than suggested because I think most vintage potholders are just a bit to small. I need to look through my stash for just the right fabric for some of these projects.

Sunday, August 21, 2011

Lace Ruffle Backpack


A friend of a friend gave me a huge stash of ruffled lace trims a few months ago. There are yards and yards of all different styles and colors of lace trim mostly white and ecru. As soon as I acquired this stash I began thinking up ways to use it. My first idea was a ruffled apron, and then maybe a ruffled tote bag. But when I saw this Ruffled Backpack idea on Craft Goodies I decided a ruffled lace backpack would be so cute. She even has a mini tutorial.

I used her idea but did my own construction method. This is my trial project and I am going to try and write up a tutorial for it. There are a few things I want to change. So hope fully I can come up with a tutorial in the next couple of weeks. I think this would be perfect for a little girl to carry her treasures in. I do have a couple of little girls in mind to give these to. But I don't have any little girls around to model this for me. So I rigged it up on this chest of drawers.


This really was a quick project because all the lace was pre-ruffled. The other cool this about this project is the fabric I used as the base. It is a polyester gabardine with a nice heavy feel to it and I got it from a friend as part of a huge fabric stash she gave me. So basically this project is from free supplies. The only thing I did buy is the white twill ribbon I used for the drawcord strap. I used three ribbons braided together to give the strap more strength. I bought the ribbon at a salvage store and paid $2.99 for a spool of 500 yards. That is a lot of ribbon!! I have used it for a few other projects. I also used some lilac flowered cotton for the linning of the bag. That was a freebie too.


Saturday, August 13, 2011

Baby stuff


A coworker is having a baby girl

so it was the perfect opportunity to make up this baby quilt. I bought this simple quilt kit at Joann fabric several years ago. The kit had everything needed to make the quilt including the backing. I seem to be on a pink and orange kick lately. I do like that bright color combination. The quilt does not have batting between but I think it is just a nice weight for a simple quilt. The middle patch and the edge strips are orange dotted Minky with a soft cozy feel. The backing fabric is white flannel and the the rest is quilting cotton. This went together quickly and I am only a little happy with it. It will be an OK baby gift. The blanket is about 32" by 40".

There was a small piece of orange Minky leftover and a strip of the flannel backing too. I decided a little taggy blanket would be a nice additional gift. I have recently come across a few tutorial for taggy blankets on some blogs. I wanted to link to the most recent one I found but I can't seem to find it now. They are pretty self explanatory. They are just a tiny quilt with ribbon tags inserted all around the edge. I made mine about 10" by 14". I used various lengths of ribbon but all are small so there is no danger of a baby getting caught in one of the loops. I used what I had on hand with various textures from grosgrain to satin ribbons as well as some Ric-rack and woven brocade trims. I like the little taggy blanket made with scraps much better than the quilt. I think this is a cute little baby gift. I may make more of these when I have another baby gift to give.

UndertheTableandDreaming

Silk Top

I have had this pretty pink and orange silk chiffon fabric in my stash for a couple of years just waiting for the right project. I decided to sew up Simplicity 2599 view E. The fabric is shear so I wear a cami under it. It has a button and loop opening in the back with a faced neckline. The armhole are bound with a bias binding made out of the same fabric as the top. The ruffle at the neck edge is made with a 2" bias strip with a narrow hem on each side. Hemming the ruffle was probably the most challenging part of the project because of the delicate fabric. And then to top everything off there is a fabric bow added to the neckline.

I love the finished top and it fits great and feels very dressy when I wear it. I will definitely make this pattern again there are several different ruffled views included in the pattern. It sewed up quickly which is a real plus in my book. I think I could eliminate the button and loop closing at the back of the neck because I could easily pull the top on and off without unbuttoning. And I was having a hard time unbuttoning it while wearing it myself anyways. I have about a yard of this fabric leftover maybe I will make a little coordinating cami with it.

UndertheTableandDreaming